I honestly think I have some deep down aversion to his quilt and therefore, I keep "conveniently forgetting" to work on it. To date, I STILL have not cut the fabric for his quilt. Seriously, it's a pineapple, paper-pieced quilt I had originally intended to give (completed) for Christmas. He knows it's coming, picked out the fabrics. WHAT am I waiting for?
This week, I will cut the fabric this week.
Here's an update on progress for the other items:
colored psalm blocks for bible study - ongoing
2 Mystery qulit tops - 1 done, other still needs border. These will wait until after Christmas to finish.
F's top - design changed but fabrics all washed and pressed. Cutting this week (simple square pattern)
Winter scene kit for wall - being cut
DS #3 top - not even cut
Nieces fleece blanket - next in line to be quilted
That's that. Let me know if you can find me some time in between work, kids, coaching, athletic director requirements, sleep, attn to dogs, Christmas to do's and coffee to finish, would you? Everytime I look the schedule seems a bit tight! ;)
Okay, I have faith it will work out. I'm sure I'll post pics when all is complete rather than pause now. Stay tuned.
Wednesday, December 10, 2008
Off topic - Hooray for sports!
And basketball in particular. I love this sport, can't get enough. I am coaching my second year at my child's middle school and having a blast. The boys had their first game last night and in a real nail biter, won 14 to 13. Hooray Falcons!
Sunday, October 26, 2008
update on, well what else, me!
I've been at it like mad and trying to catch up on my projects. I think my timelines were ambitious, though. Here's where I'm at today.
J's quilt top - DONE
K's quilt top - DONE
colored psalm blocks for bible study - caught up (will be weekly blocks for 29 more weeks)
2 Mystery qulit tops - almost done, just need borders.
F's top is roughly designed, just searching for and buying fabrics now.
I still don't know what I'm going to do with the mystery quilts except as I've been sewing one, a pink one, I've been thinking it would be nice to send to an acquaintance of mine in honor of her mother who passed from breast cancer and who is participating in the Breast Cancer Walk for a Cure this weekend in GA. I'm wondering if she'd think it was nice to have a remembrence quilt to wrap up with her daughter in and tell stories of her mom. I don't know. I plan to contact her DH and seek his thoughts on this before I do.
I'll be gone most of today but when I get home, I'm going to get the fabric cut for S' quilt. Tomorrow, I plan to get downstairs and start working that mid-arm. I'll save the sewing of S' quilt for the weekend when I can sew and watch football and the mid-arm stuff for weekday. I HAVE to get moving on these.
Oh, and I feel guilty although I know I shouldn't, my sis just asked if I thought I could get a particular quilt done for Xmas for her partner. I had to tell her I didn't think so. I know once basketball season starts in a couple weeks my time will be gone but I still feel like I should try. -sigh- we'll see. If I finish the others, I'll add this in, if not, no harm.
So, that's that.
Oh, and I am adding thishttp://www.keepsakequilting.com/productdetail/3937.htm
to my to do list once it gets here. This will replace my wall of shame quilt through the Christmas season, at least.
Thursday, October 16, 2008
The Quilt of Shame
I've posted briefly once before regarding The Quilt of Shame under one of the NY Tornado posts. However, I've recently decided I have advanced enough
-HEY! stop laughing! Humph, as I was saying...
So, just as a reminder to you and I, here's why I have a Wall of Shame quilt hanging directly over my head when I sew.
1) It's to remind me how bad a buying whim for fabric really can get. What was I thinking with that paisley blue stuff and when/where did I ever think I'd use that thimble fabric?

4) Binding should be finished off neatly and not at each corner with thread showing, especially with thread tails hanging off. (Although, in my defense, I remember getting to this point and thinking I just didn't care and had to finish the damn thing so I could say I did.)

Since I can list all these errors, I'm certain I have learned from them well enough to remove the eyesore and put up something to be proud of.
My eventual goal, to do a peek-a-boo quilt which features, I hope, fabrics that remind me of my childhood. Fabrics like Yogi Bear and Paddington Bear. I think this would be fun and the nieces and nephews will enjoy. However, since I have guests coming for the holidays, I think I'd like to do something more Christmas-y.
Choice A - A large piece of fabric with a Christmas scene colored in crayons by me and the kids (youngest is 8 so there's hope this won't go too nuts in outside of the line coloring.) Then do some quilting around the picture. However, the downside to this may be the drawing I create since I'm NOT artistically inclined when it comes to drawing (or coloring for that matter!)
Choice B - A holiday kit from some store that's quick and easy, again, Christmas theme.
Choice C - Tie some red and green ribbons from the drapery bar and call it a day!
Just for the record, if you don't vote, I'll have to resort to deciding under the influence of a couple cocktails and let's face it, my family and friends suffer with the last time I did that. Can I just say, "Tornado?" ;)
-HEY! stop laughing! Humph, as I was saying...
advanced enough to put something nicer there BECAUSE, I think I've learned my lessons.
Yes, well, I laughed at that too but I think I've learned to at least hide my mistakes better. Is that a more acceptable way to say it?
So, just as a reminder to you and I, here's why I have a Wall of Shame quilt hanging directly over my head when I sew.
1) It's to remind me how bad a buying whim for fabric really can get. What was I thinking with that paisley blue stuff and when/where did I ever think I'd use that thimble fabric?

2)You must BASTE when quilting or it shifts EVERYWHERE.

3) Binding should not have thread showing through it on the front, I think. Some on the front is not too bad, right? It's just when it's not at the edge, right? Right?


4) Binding should be finished off neatly and not at each corner with thread showing, especially with thread tails hanging off. (Although, in my defense, I remember getting to this point and thinking I just didn't care and had to finish the damn thing so I could say I did.)

5) SID really means stitching IN the ditch, not wavy lines around the ditch.

6) Pulling the quilt through the machine results in puckers and uneven stitches. No, really, it does. Oh, and "squaring up" doesn't mean quilt first then try to straighten edges later.

My eventual goal, to do a peek-a-boo quilt which features, I hope, fabrics that remind me of my childhood. Fabrics like Yogi Bear and Paddington Bear. I think this would be fun and the nieces and nephews will enjoy. However, since I have guests coming for the holidays, I think I'd like to do something more Christmas-y.
Care to vote?
Choice A - A large piece of fabric with a Christmas scene colored in crayons by me and the kids (youngest is 8 so there's hope this won't go too nuts in outside of the line coloring.) Then do some quilting around the picture. However, the downside to this may be the drawing I create since I'm NOT artistically inclined when it comes to drawing (or coloring for that matter!)
Choice B - A holiday kit from some store that's quick and easy, again, Christmas theme.
Choice C - Tie some red and green ribbons from the drapery bar and call it a day!
Just for the record, if you don't vote, I'll have to resort to deciding under the influence of a couple cocktails and let's face it, my family and friends suffer with the last time I did that. Can I just say, "Tornado?" ;)
Tuesday, October 14, 2008
Project timeline update
So this post is more for me than you but I'm still going to share because it might give you some insight into just how glutten for punishment I am. Or maybe I should say crazy, loca, bites off more than I can chew or simply, "I create my own stress."
Anyway, remember that timeline I wrote about a few weeks ago? I think it's in the broken fingers post, ahh, yes, here it is below again, with the results.
"So here is my timeline:
DH's and B's (friend's son) blankets done by 9/13. - COMPLETED LATE
S's fabric cut on/about 9/12-9/14. - INCOMPLETE
P's sashing sewn by 9/20. - INCOMPLETE
J's windows & K's 4-patch blocks sewn by 9/22. - K: COMPLETE, J: INCOMPLETE
J's sashing & K's sashing sewn by 9/29. - K: COMPLETE, J: INCOMPLETE
Psalm quilt blocks by 9/30." -INCOMPLETE
So now I have very little completed off that list. What do I do instead? I add the signature quilt and a mystery challenge to my plate. And not only that, I'm still behind on designing the one quilt I really WANT to finish for Christmas for someone else in my family (on the off chance they read this blog occasionally, I do not want to give it away.)
Well, here's the revised list, the one that makes me wonder what is wrong with my idea of "relaxation." Truthfully, quilting relaxes me but do I feel I'll run out of things to do if I don't pile a bunch on my plate at the same time? Or do I have a backward sense of what relaxing really means... you decide for yourself. For me, I think it's the latter.
Today, 10/14 - complete borders on K's top.
This week:
sew J's attic window top
cut S's top pieces
finish practice quilt on mid-arm
quilt LSU blanket on mid-arm
design family member's quilt (let's call it F's quilt)
work on myster challenge blocks
Next week (10/21):
sew P's sashing and borders
quilt monkey blanket for niece on mid-arm
quilt K's top on mid-arm
start sewing blocks for S's top
work on mystery challenge blocks
choose, wash & cut fabric for F's quilt
Week of 10/28:
msytery challenge blocks
complete blocks for S' top & sew in sashing
quilt J's top on mid-arm
start sewing F's quilt top blocks
Well, that should get me started for Oct, right? Let's see if I can stick to this schedule cause I'm hoping it's not overly-ambitious but realistically, thinking it might be. Now you know why I question my sanity!
Friday, October 10, 2008
My "good deed" signature quilt
Just an update to let you know I finished the signature quilt. Had to tie it since I didn't have time to quilt it properly but it still came out nice. I did notice in the pictures, a day later, an upside down block but well, that just makes it unique! ;)


Here's the only pics I have. They are pre-lint brush so ignore the threads.


Friday, September 26, 2008
Quilt mystery- All in the color family
I am a gluten for punishment. SOMEONE STOP ME!
I am participating in a mystery challenge from one of my message boards (the same board which led me to creat the NY Tornado).
Where's my head? I don't have time, but I see a fun challenge to do for no better reason than to push out some of my stash fabric and practice my skills. For me, only me, no one else. So, no pressure, right?
HA! There's the time pressure... what is the matter with me? You'd think I dont' have anything else to do...
Stand by, I'll let you know how it turns out.
Monday, September 22, 2008
A good deed never goes unpunished.
My girlfriend calls me today and tells me the school secretary is leaving for health reasons and the principal asked if anyone had ideas of what could be done for her before she goes. She thought of making a signature quilt but of course, needed me to do that. ;) She called, asked if I'd be up for it with her acting as my diligent assistant in all things needed and I said sure, I could help. The pattern she had in mind (we deviated from anyway) wasn't difficult. Just some 4-patches with sashing.
So, she comes over after school today to develop a pattern with me and pick through some of my fabrics. We figure we may as well delve into my stash before spending money. We look through, she finds both a pattern on hand which will work plus all but one fabric needed. She's going to get that one at the store. Also, she will obtain all signatures so I don't need to worry about that item. HOORAY!
Now, with this coming together so nicely, I get the bombshell. This needs to be completed by Oct. 3. It's Sept. 22 today! I wouldn't be concerned if the end of September wasn't usually so busy at work that I hardly have time to think about showering let alone take care of house and kids. Yikes. I think she saw me a little panicked for the first time, ever, in our years long friendship.
Poor girl. I took a few deep breaths, came on here to blow off some of my anxiety and have a glass of wine and then I'm off to wash and press the fabrics. First order of business, get the freezer paper pressed to the fabric so signatures can be obtained without issue. At least, I think that's the best way to go. I'll be doing some research tonight on that also.
So, my good deed to help a friend out and show my appreciation for all the secretary has done has turned into the old adage of feeling it won't go unpunished. -wink- Aww, seriously, I know I'll feel good about this in the end and since we decided to use fleece back instead of cotton batting and backing, it will go even faster. I will likely just quilt in the ditch based on the design to highlight particular squares. We'll see, that's a decision for next weekend.
Cheers!
Wednesday, September 17, 2008
Let's talk... FOOD!
I love food.
Wait let me revise that. I love to EAT food. I like the smell when it's cooking, I like taste and texture and most of the time, I even enjoy the prep work. It seems my family is much the same way so I've decided I'm going to add the periodic rambling about food in my blog. What promted this? Well, I blame all those foodie bloggers out there. Fantastic ramblings about a recipe just made, beautiful descriptions, and just plain make your mouth water pictres. There is nothing worse than a person who has a way with words and hten follows it up with picture proof. DARN YOU ALL!
I baked this cake and created the following topping:
- approx. 1 tsp blueberry syrup
- approx 2-3 tsp apple butter
- 1/16 tsp nutmeg
- 1/8 tsp cinnamon
1. Combine all ingredients and warm for 30 seconds. Spread over cake.
2. Make glaze, 1 Tbsp water to approx 4-5 Tbsps. powdered sugar, whisk together with a splash of lemon juice. When glaze consistency, drizzle over cooled cake & filling. You can drizzle over warm cake and filling but the glaze will dissolve into the filling vs sitting on top. It's your choice.
3. ENJOY!
Here are pictures of my first attempt without filling (it was a little undercooked), with filling & glaze and a cut slice (YUM). I will do this again and again with many different toppings, I'm sure, since it was that simple!


Tuesday, September 9, 2008
Broken fingers
Well, I was "out of sewing commission" for approximately 2 weeks (typing also). Why? 2 broken fingers on my left hand due to a basketball game with my step-son, the index and middle fingers to be precise. Because the break on both fingers was at the base of the finger, right before the knuckles on your palm, my hand had to be immobilized by a splint which ran from elbow to finger tip.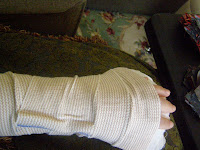
I know what you are thinking, "your finger tips still show, you wimp. You could still stabilize the fabric with your fingertips or splint and let it run through the machine, even if you couldn't hand stitch."
Well, rest assured, I thought the same thing and tried it. EXCEPT HOLY HECK! The first week it hurt (even with the 800mg of ibuprophen I was taking for swelling) to put any pressure on it. So, one week down. Week two, hardly any pain at all and I tried but straight line sewing, no matching seams was all I was able to accomplish with such a large unwieldy splint. The shap under the fingers was that of a hollowed out ball. Needless to say, 2 weeks out.
Then what happens? Kids and I return from our summer stay in TN and I've brought a new puppy into the house now also. Hmm, school starting, settling back into the house and getting a new puppy settled. Oh yeah, and making sure the old puppy can live with the change, too! Sewing took a back seat again.

 Honestly, I haven't even sent my NY Tornado on its way yet but I will. I have decided who it's going to and they should receive it this week.
As for sewing, I've started that back up again with washing, ironing and cutting fabrics for the kids Christmas quilts I'm doing. J's (an attic window design) and K's (a 4-patch variation) quilts should be relatively quick to make, cutting and ironing were likely to be the longest for those two. P's quilt has all the flying geese blocks sewn, that's what I was working on when I broke my fingers, so I will start the sashing soon and S's quilt fabric has been washed and ironed but needs to be cut now. He'd like a pinapple quilt. This will take the longest to cut and piece but I'm confident I will get them done.
A couple other projects in front of me. DH wants a blanket for hunting and I owe a b-day present So here is my timeline:
DH's and B's (friend's son) to a friend's son. He's opted to forego the video game if I would make a blanket like one he saw in my son's room. The good news on both of those are they are both VERY simple fleece blankets which I should be able to crank out in a couple hours.
I also start part 2 of my Quilting the Psalms group in Oct. I have to finish a couple blocks from Part 1 but believe I can get that accomplished soon.
Finally, the cream of the crop, I am designing a quilt for dad. I do not want to say any more than that on the off chance he comes by and reads this but suffice it to say, I want to leave LOTS of time to work on that. I will speak about it retroactively after the holidays.
blankets done by 9/13.
S's fabric cut on/about 9/12-9/14.
P's sashing sewn by 9/20.
J's windows & K's 4-patch blocks sewn by 9/22.
J's sashing & K's sashing sewn by 9/29.
Psalm quilt blocks by 9/30.
Sounds like a lot for this month but I don't really think so, especially given how quick J's and K's will go.
Wish me luckfor Sept. since Oct. will focus on S's and Dad's quilts!
Wednesday, August 20, 2008
NY Tornado - Part 3
I have bitten the bullet, I'm the first to hang the NY Tornado and now it's time to let it spin along. See the photo below, this is the view of the halls right as you walk in the front door. It's in a prominent place...


I hope many of you who receive it do come along and post a comment to this post letting us all know it's arrived and moved on.
Now, just for you readers, a copy of the note going along with the NY Tornado.
Now, just for you readers, a copy of the note going along with the NY Tornado.
"CONGRATULATIONS!
The NY Tornado has touched down and now you have to handle the aftermath but first, you must know the Tornado has been sent to you by someone who loves you dearly and wanted you to experience it, just as they had. Here’s what you must do to be able to clean up after this particular Tornado.
This Tornado must hang in your home, in a conspicuous location for at least one week (longer if you desire). When you take the Tornado down, sigh the back with the pen provided. Include your first name, city and state. Last name or other family member names are optional. Next, mail the NY Tornado on to a loved one you know will be as grateful as you were to receive such a surprise or, if and when possible, simply hang this Tornado in the home of your loved one. (Please, no holes in the walls, simply remove a picture and use the nail already created.)
Once the NY Tornado is on its way or has been hung elsewhere, please post a comment to this blog, http://sarcasticquilter.blogspot.com/, or send an email to me at _X_ and I will post the notice of where it was and has gone to. This should help us all keep track of where the Tornado has last been spotted touching down. We will share the love and beauty of the NY Tornado as long as possible and with as many as possible.
For the story behind this quiltlet, and the reason for its journey, please read the back of this paper. Thank you for your humor and participation!
Kindest Regards, B (a.k.a., the Sarcastic Quilter)
The NY Tornado Quiltlet’s abbreviated story:This quiltlet was created as a result of a quilting challenge. The challenge was to use specific NY Beauty block patterns and an ugly fabric you had in your stash. The challenge was called “Beauty and the Beast” and the object was to use your ugly fabric in a large area of the block but to disguise it in any way possible using the pattern and other fabrics. The rest of this story is posted on my blog but in short, I am proud I did exactly what I was supposed to do. The ugly fabric is the off white fabric with colored clouds. However, I cannot get past feeling this quiltlet is still ugly and sitting with family, I wondered aloud what I should do with it now that it was complete. A joke started about leaving it in someone’s home but that’s limited to those few who knew the quiltlet’s story. Then it made sense. Share this quiltlet and its story with many. Too much work went in it to throw it away but no one really wants to keep it (and really, if the quilter feels like that, is it a no wonder others do?) Since it looked like a tornado ripping apart city skyscrapers to me, I named it the NY Tornado and I am watching it spin out of my home and to each and every one of you. I hope it doesn’t get stuck in one location too long and I really hope you enjoy passing along this proverbial fruitcake to the next lucky recipient as much as I enjoy seeing this get passed on to you."
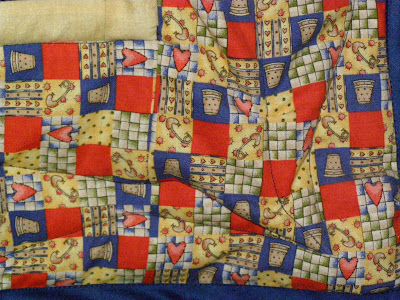
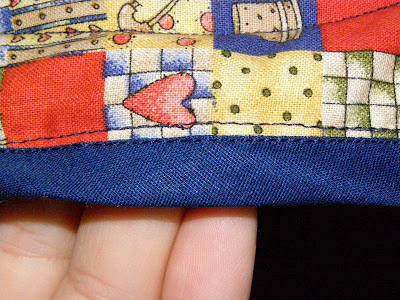
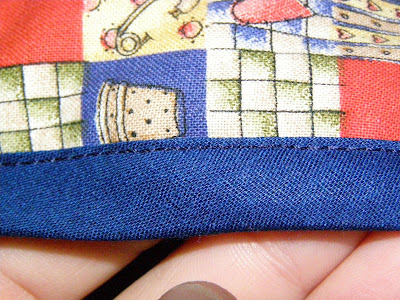
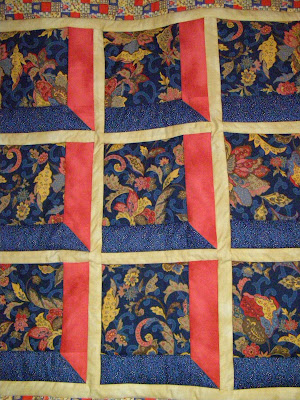
My first Quillow
I created this for my friend's daughter as a gift to congratulate her on making her First Eucharist. She loved it and so do I. See the two posts on Quillow instructions for how I did it. :)


Friday, July 25, 2008
Quillow Instructions - Part 2
10) Sew rows together and now you have your quilt top. 
11) Measure the width and the length of your quilt top to cut the pillow pocket. The width of the pocket will be the quilt top’s width divided by 3 and the length of the pocket will be the quilt top’s length divided by 4. (For my example, the top width = 37.5” and the top length = 42” this made the fabric cut for my pillow pocket a 12.5” x 10.5” rectangle.) Cut 2 pieces of fabric of your choice.
12) Place pillow pocket pieces right sides together, determine which end is the bottom and sew around the 2 sides and top leaving the bottom open. Turn right side out, push seams and corners out and press flat.
13) Center pillow pocket on bottom edge of the quilt front and baste or sew in place. (Note, the pocket side which shows in this step is the side which will be the side you see when your quillow is in the closed position (as a pillow). It will be hidden when the quillow is in it’s blanket form.) Pin in place.
14) Lay a piece of anti-pill fleece, right side up on the floor (this piece should be the same size as your quilt top) and lay the quilt top wrong side up on top of the fleece (meaning they will be right sides together.) Pin together.
 15) Sew fleece and quilt top together EXCEPT for an 8”to 10” gap along one side. Trim the corners at an angle being careful not to cut stitches out of the corner. Turn right-side out using the hole left in the side.
16) Push corners sharp and edges out as much as possible. Press as flat as possible. Sew open seam shut. Remove pins from pillow pocket and let it hang off the edge.
At this point, I like to sew a straight seam approximately ¼” away from the edge around the entire quillow top. (If you pocket is hanging away from the quillow top, you will not stitch over it during this step.)

17) You should now have a quilt top and backing together with the pillow pocket hanging off the bottom edge. IF you plan to quilt your quillow with a design, this is the time to do it, BEFORE you sew the pillow pocket completely to the top. (Really, trust me on this one!) The alternative to this is you can, upon completion of sewing the pillow on, just tie the layers together, if you desire.
Hey! You trusted me…good. My instructions: quilt as desired. It helps if you use a walking foot with the fleece so keep quilting relatively straight or only with slight curves (because of the walking foot).

Additional point, now would be the time to quilt the pillow pocket as well.


11) Measure the width and the length of your quilt top to cut the pillow pocket. The width of the pocket will be the quilt top’s width divided by 3 and the length of the pocket will be the quilt top’s length divided by 4. (For my example, the top width = 37.5” and the top length = 42” this made the fabric cut for my pillow pocket a 12.5” x 10.5” rectangle.) Cut 2 pieces of fabric of your choice.
12) Place pillow pocket pieces right sides together, determine which end is the bottom and sew around the 2 sides and top leaving the bottom open. Turn right side out, push seams and corners out and press flat.
13) Center pillow pocket on bottom edge of the quilt front and baste or sew in place. (Note, the pocket side which shows in this step is the side which will be the side you see when your quillow is in the closed position (as a pillow). It will be hidden when the quillow is in it’s blanket form.) Pin in place.
14) Lay a piece of anti-pill fleece, right side up on the floor (this piece should be the same size as your quilt top) and lay the quilt top wrong side up on top of the fleece (meaning they will be right sides together.) Pin together.
 15) Sew fleece and quilt top together EXCEPT for an 8”to 10” gap along one side. Trim the corners at an angle being careful not to cut stitches out of the corner. Turn right-side out using the hole left in the side.
16) Push corners sharp and edges out as much as possible. Press as flat as possible. Sew open seam shut. Remove pins from pillow pocket and let it hang off the edge.

At this point, I like to sew a straight seam approximately ¼” away from the edge around the entire quillow top. (If you pocket is hanging away from the quillow top, you will not stitch over it during this step.)


17) You should now have a quilt top and backing together with the pillow pocket hanging off the bottom edge. IF you plan to quilt your quillow with a design, this is the time to do it, BEFORE you sew the pillow pocket completely to the top. (Really, trust me on this one!) The alternative to this is you can, upon completion of sewing the pillow on, just tie the layers together, if you desire.
Hey! You trusted me…good. My instructions: quilt as desired. It helps if you use a walking foot with the fleece so keep quilting relatively straight or only with slight curves (because of the walking foot).

Additional point, now would be the time to quilt the pillow pocket as well.

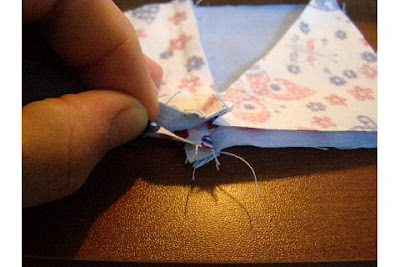
18) Once quilted, lay the quillow flat on the floor or table and pin the pillow pocket in place on the BACK of the quilt (fleece side). Sew up the left side to the top of the pocket. Backstitch a couple times at the end and/or add a couple zig-zag stitches for strength. Do the same on the right side. Reinforce the bottom edge with a straight stitch across, if you desire.  Your quillow is now complete.
Congratulations!
To fold a quillow:
Fold the quilt right side to the back bringing the edge to the opposite edge of the pillow pocket.
 Fold the left side in to the opposite edge of the pillow pocket.
  Your quilt should now be 1/3 the width it previously was.
Fold the length in half once, then a second time.
  Remember, you have to have the pillow pocket out so all folds will take place on the fleece side of the quilt.
From the front, reach into the pillow pocket and grab a corner of the folded quilt through the pillow top. Pull the quilt through while turning the pocket inside out.
  Push corners into place, smooth out any ripples and now you have your pillow portion of the quillow.
  I hope these were useful instructions. Enjoy your next project!
 Your quillow is now complete.
 Congratulations!
To fold a quillow:
Fold the quilt right side to the back bringing the edge to the opposite edge of the pillow pocket.
 Fold the left side in to the opposite edge of the pillow pocket.
  Your quilt should now be 1/3 the width it previously was.
Fold the length in half once,
 then a second time.
  Remember, you have to have the pillow pocket out so all folds will take place on the fleece side of the quilt.
From the front, reach into the pillow pocket and grab a corner of the folded quilt through the pillow top.
 Pull the quilt through while turning the pocket inside out.
  Push corners into place, smooth out any ripples and now you have your pillow portion of the quillow.
  I hope these were useful instructions. Enjoy your next project!
Quillow Instructions - Part 1
Materials (all are approximate measurements for a quillow which measures 40”x36”:
½ yd blue star fabric
1/3 yd white dot fabric
1 1/3 yd white butterfly fabric
1 yd red fabric
1 1/3 yd light blue fabric
NOTE: all sewing should be done with a ¼” seam allowance.
Cut:
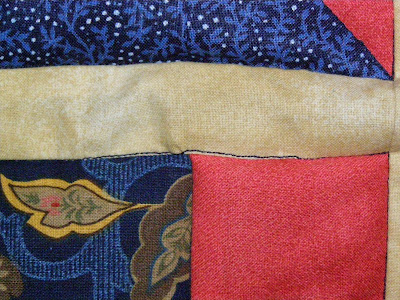
9, 4 ¾”squares from red
18, 1 ¼” x 5 ¼” strips from white dot fabric
18, 1 ¼” x 6 ¾” strips from white dot fabric
47, 3 ½” x 3 ½” light blue squares
24, 3 ½” x 3 ½” white butterfly squares
23, 3 ½” x 3 ½” blue star squares
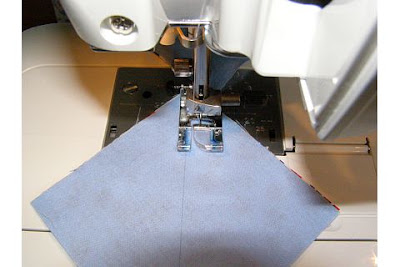
To ensure consistency, I had to mark a permanent line on my presser foot at the ¼” from center needle position. I did this for right and left side. This may be hard to see in the pictures but it helps me sew straighter.)
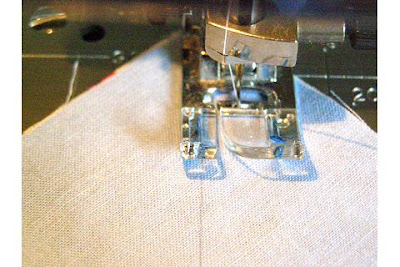
Do this on both sides of the line and for all square pairs and press to set all sewing. I like to chain stitch this portion to keep it moving quickly.

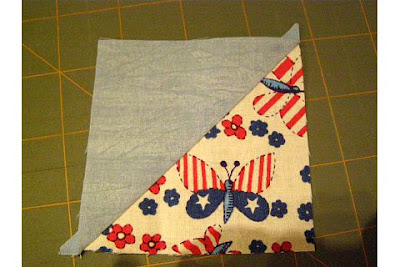 Trim off excess triangle points so the square, when laid opened has straight edges.
 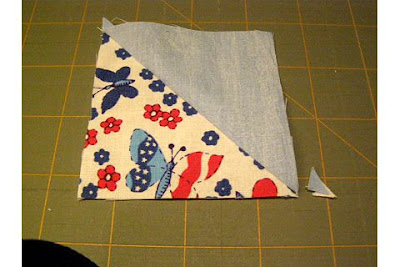 5) Create 2-square sets by putting two white butterfly squares right sides together, matching diagonal seams, and sewing along the right side.
  The fabrics should alternate between butterfly and light blue without same colors touching each other. You will repeat this step until all butterfly squares are used and you will repeat it with all blue star squares also. Press open.
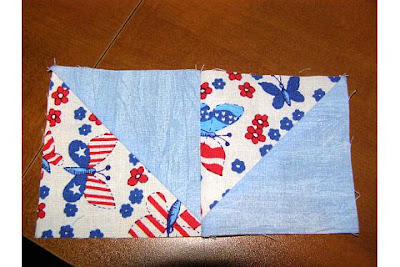
6) Now, take a 2-square set and put it right side together with another 2-square set to create your pinwheel block. Match center straight seams, sew together and press open. Be sure to sew the correct side to ensure the pinwheel comes out correctly when opened. Keep all butterfly square sets joined with other butterfly sets and blue stars with blue stars.


(See Part 2 for finishing this quillow.)
½ yd blue star fabric
1/3 yd white dot fabric
1 1/3 yd white butterfly fabric
1 yd red fabric
1 1/3 yd light blue fabric
NOTE: all sewing should be done with a ¼” seam allowance.

Cut:
9, 4 ¾”squares from red
18, 1 ¼” x 5 ¼” strips from white dot fabric
18, 1 ¼” x 6 ¾” strips from white dot fabric
47, 3 ½” x 3 ½” light blue squares
24, 3 ½” x 3 ½” white butterfly squares
23, 3 ½” x 3 ½” blue star squares
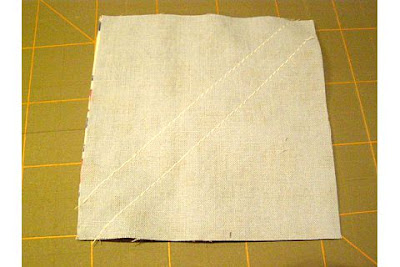
1) Put 1 butterfly square and 1 light blue square right sides together, draw a diagonal line from one corner to another on the wrong side of one of the fabrics. Do the same for all butterfly squares and a light blue square until there aren’t any more butterfly squares. Repeat this process for all blue star squares using a blue star square and a light blue square. 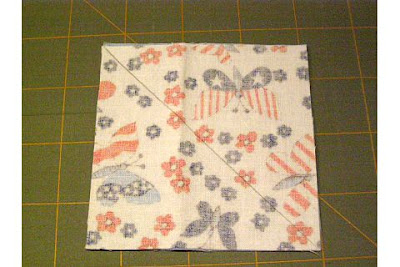
2) Sew diagonally, ¼” distance from, but parallel to, the drawn line.

2) Sew diagonally, ¼” distance from, but parallel to, the drawn line.

To ensure consistency, I had to mark a permanent line on my presser foot at the ¼” from center needle position. I did this for right and left side. This may be hard to see in the pictures but it helps me sew straighter.)


Do this on both sides of the line and for all square pairs and press to set all sewing. I like to chain stitch this portion to keep it moving quickly.

3) Press to set all sewing the n cut along the diagonal line of all squares.
 n cut along the diagonal line of all squares.
4) Press open triangles, pressing toward light blue fabric. Be careful to press open lightly and not iron so you do not distort the shape of the triangles.
 Trim off excess triangle points so the square, when laid opened has straight edges.
  5) Create 2-square sets by putting two white butterfly squares right sides together, matching diagonal seams, and sewing along the right side.
  The fabrics should alternate between butterfly and light blue without same colors touching each other. You will repeat this step until all butterfly squares are used and you will repeat it with all blue star squares also. Press open.
6) Now, take a 2-square set and put it right side together with another 2-square set to create your pinwheel block. Match center straight seams, sew together and press open. Be sure to sew the correct side to ensure the pinwheel comes out correctly when opened. Keep all butterfly square sets joined with other butterfly sets and blue stars with blue stars.


7) If necessary, trim red squares smaller to allow for finished size (once white strips are added) to be the same as finished pinwheel squares. Sew 1 ½” x 4 ¾” strips to two opposite sides of the red squares, press open and trim off any excess fabric.
 8) Sew longer strips to remaining two sides of the red squares, press open. Trim off any excess fabric.
 8) Sew longer strips to remaining two sides of the red squares, press open. Trim off any excess fabric.
9) Arrange squares in the pattern of your choice. I use an open area on the floor to lay them out and visualize my options. Once satisfied, pick up squares in a set order. (For me this step is very important. I always pick up left to right and have the left edge on top of the pile. This avoids me mixing them up. I keep the row piles separate but also in order.) Sew up rows in the order squares were laid, pressing open each sewn block set before adding another square. A helpful note, if you can remember to, always press the seams in the same direction along an individual row but alternating to the opposite direction for the next row. For example, my first row has all seams from the sewn blocks pressed toward the right side of the quillow. My second row h as all block seams set toward the left side of the quillow. Row 3, right side, row 4, left, and so on. When I later sew the rows together, I can match these seams for each block- the will lay flat and butt up against each other (or I can stretch a little here and there if necessary) creating sharp corners on my finished top.

(See Part 2 for finishing this quillow.)
Subscribe to:
Posts (Atom)