
11) Measure the width and the length of your quilt top to cut the pillow pocket. The width of the pocket will be the quilt top’s width divided by 3 and the length of the pocket will be the quilt top’s length divided by 4. (For my example, the top width = 37.5” and the top length = 42” this made the fabric cut for my pillow pocket a 12.5” x 10.5” rectangle.) Cut 2 pieces of fabric of your choice.
12) Place pillow pocket pieces right sides together, determine which end is the bottom and sew around the 2 sides and top leaving the bottom open. Turn right side out, push seams and corners out and press flat.
13) Center pillow pocket on bottom edge of the quilt front and baste or sew in place. (Note, the pocket side which shows in this step is the side which will be the side you see when your quillow is in the closed position (as a pillow). It will be hidden when the quillow is in it’s blanket form.) Pin in place.
14) Lay a piece of anti-pill fleece, right side up on the floor (this piece should be the same size as your quilt top) and lay the quilt top wrong side up on top of the fleece (meaning they will be right sides together.) Pin together.
 15) Sew fleece and quilt top together EXCEPT for an 8”to 10” gap along one side. Trim the corners at an angle being careful not to cut stitches out of the corner. Turn right-side out using the hole left in the side.
16) Push corners sharp and edges out as much as possible. Press as flat as possible. Sew open seam shut. Remove pins from pillow pocket and let it hang off the edge.

At this point, I like to sew a straight seam approximately ¼” away from the edge around the entire quillow top. (If you pocket is hanging away from the quillow top, you will not stitch over it during this step.)


17) You should now have a quilt top and backing together with the pillow pocket hanging off the bottom edge. IF you plan to quilt your quillow with a design, this is the time to do it, BEFORE you sew the pillow pocket completely to the top. (Really, trust me on this one!) The alternative to this is you can, upon completion of sewing the pillow on, just tie the layers together, if you desire.
Hey! You trusted me…good. My instructions: quilt as desired. It helps if you use a walking foot with the fleece so keep quilting relatively straight or only with slight curves (because of the walking foot).

Additional point, now would be the time to quilt the pillow pocket as well.

18) Once quilted, lay the quillow flat on the floor or table and pin the pillow pocket in place on the BACK of the quilt (fleece side). Sew up the left side to the top of the pocket. Backstitch a couple times at the end and/or add a couple zig-zag stitches for strength. Do the same on the right side. Reinforce the bottom edge with a straight stitch across, if you desire.  Your quillow is now complete.
Congratulations!
To fold a quillow:
Fold the quilt right side to the back bringing the edge to the opposite edge of the pillow pocket.
 Fold the left side in to the opposite edge of the pillow pocket.
  Your quilt should now be 1/3 the width it previously was.
Fold the length in half once, then a second time.
  Remember, you have to have the pillow pocket out so all folds will take place on the fleece side of the quilt.
From the front, reach into the pillow pocket and grab a corner of the folded quilt through the pillow top. Pull the quilt through while turning the pocket inside out.
  Push corners into place, smooth out any ripples and now you have your pillow portion of the quillow.
  I hope these were useful instructions. Enjoy your next project!
 Your quillow is now complete.
 Congratulations!
To fold a quillow:
Fold the quilt right side to the back bringing the edge to the opposite edge of the pillow pocket.
 Fold the left side in to the opposite edge of the pillow pocket.
  Your quilt should now be 1/3 the width it previously was.
Fold the length in half once,
 then a second time.
  Remember, you have to have the pillow pocket out so all folds will take place on the fleece side of the quilt.
From the front, reach into the pillow pocket and grab a corner of the folded quilt through the pillow top.
 Pull the quilt through while turning the pocket inside out.
  Push corners into place, smooth out any ripples and now you have your pillow portion of the quillow.
  I hope these were useful instructions. Enjoy your next project!


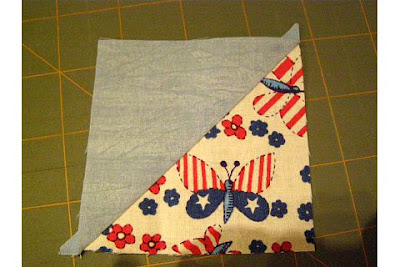 Trim off excess triangle points so the square, when laid opened has straight edges.
 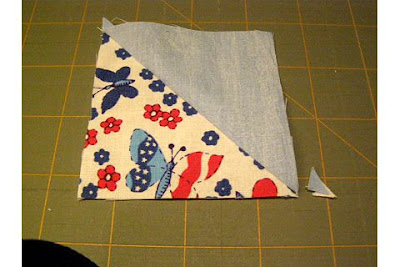 5) Create 2-square sets by putting two white butterfly squares right sides together, matching diagonal seams, and sewing along the right side.
  The fabrics should alternate between butterfly and light blue without same colors touching each other. You will repeat this step until all butterfly squares are used and you will repeat it with all blue star squares also. Press open.


 8) Sew longer strips to remaining two sides of the red squares, press open. Trim off any excess fabric.
